C++でOpenCVを使って疎密探索によるテンプレートマッチングを実装する
OpenCVにおける基礎ともいえるテンプレートマッチングのプログラムです。初めてOpenCVというものに触れたので、完成するまでにすごい時間がかかりました。
入力画像とテンプレート画像
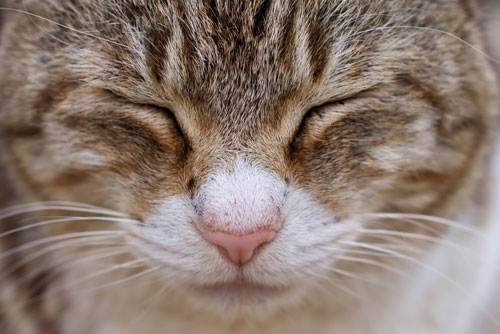

ちょうど左目のあたりの画像をテンプレートとしています。
ソースコード
#include <opencv2\core\core.hpp>
#include <opencv2\highgui\highgui.hpp>
#include <opencv2\imgproc\imgproc.hpp>
#include <iostream>

using namespace std;
using namespace cv;

Mat pyr(Mat, int);   // 画像ピラミッド生成
void sad(Mat, Mat);  // 高速テンプレートマッチング

int main()
{
	Mat src_img = imread("sample.jpg", 0);  // 入力画像
	Mat tmp_img = imread("sample_t.jpg", 0);  // テンプレート画像

	sad(src_img, tmp_img);

	waitKey(0);

	return 0;
}

Mat pyr(Mat src, int n)  //(入力画像,出力画像の大きさ[1/(2^n)])
{
	Mat dst = src;

	for (int i = 0; i < n; i++)	pyrDown(dst, dst);  // pyrDownは元画像の半分の画像を生成する標準関数

	return dst;
}

void sad(Mat src, Mat tmp)
{
	int sad_min = INT_MAX;
	int sad_x = 0;
	int sad_y = 0;

	// 第一段階
	Mat src1_4 = pyr(src, 2);  // 4分の1の入力画像
	Mat tmp1_4 = pyr(tmp, 2);  // 4分の1のテンプレート画像
	for (int y = 0; y < src1_4.rows - tmp1_4.rows; y++){
		for (int x = 0; x < src1_4.cols - tmp1_4.cols; x++){
			int sad = 0;
			for (int j = 0; j < tmp1_4.rows; j++){
				for (int i = 0; i < tmp1_4.cols; i++){
					sad += abs((int)src1_4.at<uchar>(y + j, x + i) - (int)tmp1_4.at<uchar>(j, i));
					if (sad > sad_min) goto SSDA_loop1;
				}
			}
			sad_min = sad;
			sad_x = x;
			sad_y = y;
		SSDA_loop1:;
		}
	}

	// 第二段階
	Mat src1_2 = pyr(src, 1);  // 2分の1の入力画像
	Mat tmp1_2 = pyr(tmp, 1);  // 2分の1のテンプレート画像
	sad_min = INT_MAX;
	int yyy = sad_y * 2;  // 画像が2倍の大きさになるので2倍
	int xxx = sad_x * 2;
	// テンプレート画像サイズの周囲±1ピクセルの範囲を探索
	for (int y = yyy - 1; y <= yyy + 1 && y < src1_2.rows - tmp1_2.rows; y++){
		for (int x = xxx - 1; x <= xxx + 1 && x < src1_2.cols - tmp1_2.cols; x++){
			int sad = 0;
			for (int j = 0; j < tmp1_2.rows; j++){
				for (int i = 0; i < tmp1_2.cols; i++){
					sad += abs((int)src1_2.at<uchar>(y + j, x + i) - (int)tmp1_2.at<uchar>(j, i));
					if (sad > sad_min) goto SSDA_loop2;
				}
			}
			sad_min = sad;
			sad_x = x;
			sad_y = y;
		SSDA_loop2:;
		}
	}

	// 第三段階
	Mat src1_1 = src.clone();  // 元画像と同じ大きさの入力画像
	Mat tmp1_1 = tmp.clone();  // 元画像と同じ大きさのテンプレート画像
	sad_min = INT_MAX;
	int yy = sad_y * 2;  // 画像が2倍の大きさになるので2倍
	int xx = sad_x * 2;
	// テンプレート画像サイズの周囲±1ピクセルの範囲を探索
	for (int y = yy - 1; y <= yy + 1 && y < src1_1.rows - tmp1_1.rows; y++){
		for (int x = xx - 1; x <= xx + 1 && x < src1_1.cols - tmp1_1.cols; x++){
			int sad = 0;
			for (int j = 0; j < tmp1_1.rows; j++){
				for (int i = 0; i < tmp1_1.cols; i++){
					sad += abs((int)src1_1.at<uchar>(y + j, x + i) - (int)tmp1_1.at<uchar>(j, i));
					if (sad > sad_min) goto SSDA_loop3;
				}
			}
			sad_min = sad;
			sad_x = x;
			sad_y = y;
		SSDA_loop3:;
		}
	}

	// テンプレートマッチング位置を四角で囲む
	Mat rect = src.clone();
	rectangle(rect, Point(sad_x, sad_y), Point(sad_x + tmp.cols, sad_y + tmp.rows), Scalar(0, 0, 200), 3, 4);
	namedWindow("Rectangle", CV_WINDOW_AUTOSIZE);  // ウィンドウ表示の準備
	imshow("Rectangle", rect);  // ウィンドウで表示
	imwrite("build.jpg", rect);  // 画像として出力

	cout << "3段階SAD法" << endl;
	// マッチした座標(左上)とそのときのsad値を表示
	cout << "(" << sad_x << ", " << sad_y << ") " << sad_min << endl;
}こんな感じに長ったらしく書きましたが、最適化すればもっと短くなるはずです。今回は、直観的にわかりやすいように順序はそのままで書きました。第1段階目のアルゴリズムが理解できれば、あとはすんなりプログラムできるでしょう。
実行結果
3段階SAD法
(138, 82) 15043
(138, 82) 15043
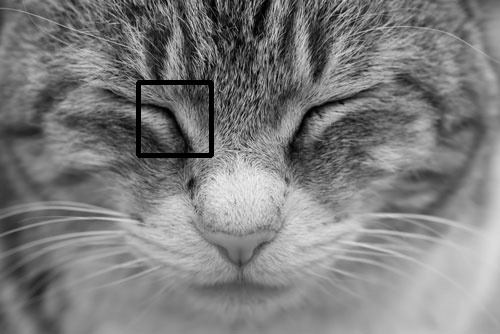
しっかりと検出できていますね!